DIY Photo Block Tutorial

What you need:
- a 2x4 piece of wood (will make lots!)
- a saw (hooray for power tools)
- acrylic paint
- printed 4x6 photo
- Mod Podge
- paint brush
- tulle or ribbon
- Sharpie
First, take a 2x4 and cut it into 4" long pieces to make the blocks. Then paint each of the blocks in the color of your choice.

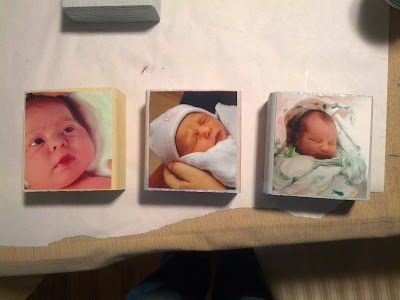
Next, get a printed copy of a picture- it could be baby, graduation, wedding, birthday, etc. In this case, I have three adorable baby pictures. Cut each picture slightly smaller than the size of the block so that you can see just a little bit of the paint around the edges of the picture.
Now grab your handy Mod Podge! Use a paint brush to coat the back of each picture and paste it to the block. Then I painted three coats over the front of the picture to seal it and protect it. Make sure to let each coat dry completely before adding the next.
Once they have dried, use a Sharpie to write a message on the back. It could be a verse, a memory, a special date, etc. In this case, I wrote the baby's name, birthday, weight, and length (not shown for privacy reasons).
Finally, wrap ribbon, fabric, or tulle around the edge and make a bow on top to finish it off for display!

I hope they don't stumble upon this post before Christmas, or it will spoil the surprise! I hope you have fun crafting for Christmas this year!
Comments
Post a Comment